Wednesday, April 21, 2010

Today's scribbling

I took a tamil book from Sunnyvale Library for my Mom but I ended up drawing the art that was on the cover! And of course I am reading the book too. Here is my reproduction of the art :)


While I was at it, I drew something for my niece Ovia too. Her favorite character of the bunch, Goofy.

There are lot more art on the book's cover, I will post them later!! Ciao.


Monday, April 12, 2010

Who said I can't touch Mission Peak?


Well, I have this habit of proving myself to be what I claim, when somebody challenges me. So thats what happened when my uncle said I can't hike all the way to the 
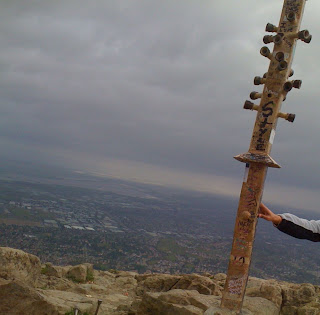
Mission peak and I did it. Its this mountain hiking place in Milpitas. My uncle hikes the place with his pals every Saturday. I am an outdoorsy person. But my uncle had hard time believing it and challenged me to touch the peak this sunday(April 11th, 2010). Hence started one of my memorable experience.

I used to go trekking every summer when I visit here while I was in undergrad. But that was just simple not-so-steep mountain climb. This one was longer and steeper than the usual place in Los Altos. We reached the place on time and started climbing. It was steep right from the foot of the mountain. To be honest initially it was tough, but not something I can't handle. We saw a "big" rabbit sleeping on the grass near the trail, light drizzle and so many beautiful scenes as we hiked. The peak of this experience is the peak itself. We couldn't have picked a day with such worse weather. Though it was so mild and fun at the bottom as we reached peak, wind was very strong. It literally pushed us through in some places, I am not exaggerating. The peak was so beautiful and was worth the pain and cold. The fun part was when we started climbing down. It was more difficult than climbing up because it was very difficult to put a break. If you loose a minute of your body control and let your legs loose you will snowball down to the bottom of the mountain, well may be not in good shape because the trail bends in place!!

It took 3 hours for the climb but as I said, it was all worth it. Now, my family agrees I am an outdoorsy person. I am planning to continue this awesome hiking every weekend in this summer!! But I seriously hope the wind becomes weaker and it is not so cold in the coming weeks.

P.S: I touched the Mission Peak proof is the picture above.

Sunday, April 11, 2010

POSIX Thread programming in C

I have to work on a project for Network programming subject this semester. The project objective is to develop an application that acts as a TCP server on top of UDP socket. Hence our project should take care of everything a TCP server basically and internally does for us, right from three way handshake till 4 way handshake. While there is that, the server have to be concurrent and it should handle few attacks like xmas tree, syn flooding.

So for the concurrency in server handling, our team decided to go with thread instead of forking new process to handle incoming connections since thread is lighter than forking. But the real reason being is I have worked on process creation in Unix for some projects in Undergrad. But I never experimented with thread creation. So what is learning when there is no experimentation involved.

While I am at it, I thought I should also blog the things I learn from thread programming in C. These things usually tend to slip away with time. Hence the post. Now this post may contain very basic instructions but for me these are baby steps. So if you are looking for complex details, this is not the post you should be reading. Thanks.

Misc:

  • Good sources: source1, source2, source3
  • All thread programs need "#include " and while compiling use "gcc -pthread filename.c" to include pthread.h. Hence use IDE to write code but terminal to run the files.

Wednesday, April 7, 2010

Virtual OS

I never really appreciated the use of virtual OS softwares until I had to carry two laptops around all day just because the simulator I need for the network lab assignment can run only on windows. So here I am installing VMware in Ubuntu 9.10 followed by Windows XP and over it the famous OPNET. I am charting the steps for my future reference and to help if someone happen to stumble upon my blog. I am also chart out other miscellaneous things that I had to learn when I do this.

Miscellaneous:

1. How to find RAM on ubuntu ?

gnome-system-monitor &

This system monitor provides better visualization of the system resources and its usage ( Source)


2. How to run .rpm file in Ubuntu?

  • sudo apt-get install alien
  • alien -k name_of_rpm_file.rpm
  • dpkg -i file.deb
The "alien" converts the rpm file into its .deb equivalent. Then run the .deb file to install the package which we downloaded as .rpm file. (source)

3. How to remove non empty directory in linux?

rm -rf

This forces and does remove non empty directory recursively. Caution while removing root directories. (source)

4. How to run .deb file in linux?

dpkg -i name.deb

It installs the software from the package. (source)

5. What is difference between .rpm and .deb installations? which one is preferred?

RPM and DEB are both package types. While using RPM, we have to take care of all dependency between files in the installation process. In DEB it is taken care and we have to just use the above command and install the package. RPM can be very frustrating and time consuming. (source)


Main VMware installation: (source1) (source2)

1. Download .tar.gz file from vmware site and also register to get the license details.
2. Uncompress the file using "tar -zvxf VMware-server-2.0.2-203138.i386.tar.gz"
3. go to the directory "vmware-server-distrib" and execute "./vmware-install.pl"
4. It looks like we need to download the patches to install vmware separately. We can get that using "wget http://www.ubuntugeek.com/images/vmware-server.2.0.1_x64-modules-2.6.30.4-fix.tgz"
5. Uncompress the file using "tar xvzf vmware-server.2.0.1_x64-modules-2.6.30.4-fix.tgz" and execute the shell as super user using "sh vmware-server.2.0.1_x64-modules-2.6.30.4-fix.sh"
6. To avoid directory confusions, we need to remove a directory as super user using "rm -rf /usr/lib/vmware/modules/binary"
7. After installing the patch required, we should be able to run "./vmware-config.pl" command successfully.
8.Then follow the instructions in the installation.
9. Continue with the default values specified for the network connections, NAT creations.
10. After a lot of probing and poking, it will ask for the activation license serial number. You would have it in a link in the registration mail. Then follow the on screen instructions.
11. If everything goes successful, you will get the following screen


Starting VMware services:
Virtual machine monitor done
Virtual machine communication interface done
Virtual ethernet done
Bridged networking on /dev/vmnet0 done
Host-only networking on /dev/vmnet1 (background) done
DHCP server on /dev/vmnet1 done
Host-only networking on /dev/vmnet8 (background) done
DHCP server on /dev/vmnet8 done
NAT service on /dev/vmnet8 done
VMware Server Authentication Daemon (background) done
Shared Memory Available done
Starting VMware management services:
VMware Server Host Agent (background) done
VMware Virtual Infrastructure Web Access
Starting VMware autostart virtual machines:
Virtual machines done

The configuration of VMware Server 2.0.2 build-203138 for Linux for this
running kernel completed successfully.


12. Now we have to manage the server using firefox browser. In address space type https://:8333 for HTTPS and http://:8222 for HTTP.

13. After adding the certificate security, we need to login as root. If we don't have a password set for root, we can do it using "sudo passwd root". For this to happen, user should have administrator privileges.

14. Login using the newly set root password.

15. Use the interface to install new OS and continue working on OS over OS..

16. Create a virtual machine with options as Windows XP, NAT, 256MB RAM, 8GB memory, with CD and USB linked to host operating system.

17. Insert Windows(in my case) installation cd in the disc drive and when you power on the virtual machine, it would detect automatically and start the installation process. I noticed that this process was far more easier than installing windows on a real machine.

18. Install VMware tools to get good responsiveness.

19. Enjoy working on two OS seamlessly.

Happy Coding!!


LATER ADDED:

God it feels so good to have both the OS in one laptop and to swtich between them easily. Anyways I found one other excellent guide to do the same as I stated above. It just uses apt-get to install vmware server. But I prefer, when you want to learn, do it by downloading package and installing it. You will learn more than you signed up for. But in future when you are just reinstalling, you can just follow the simple steps as here. (source)